details和summary标签实现折叠效果

多层折叠:

<details>
          <summary>Season1</summary>
              <details>
                <summary>Episode1</summary>
                <p>剧情简介</p>
              </details>
            <details>
              <summary>Episode2</summary>
              <p>剧情2</p>
            </details>
			
		  <summary>Season2</summary>
              <details>
                <summary>Episode1</summary>
                <p>剧情简介</p>
              </details>
            <details>
              <summary>Episode2</summary>
              <p>剧情2</p>
            </details>
</details>

单层折叠:


<details>
          <summary>目录1</summary>
          <p>内容</p>
</details>

找出服务器硬盘空间被大量占用的真凶

1、mysql-bin文件

有一台服务器,今天登录上去一看,发现硬盘空间突然被大量占用了。之前只用了不到8G,今天发现陡增到38G,足足多了30G。

先用以下命令,依次查看硬盘占用前5的文件夹:

du -hm / --max-depth=1 | sort -nr | head -5

du -hm /xxxdir --max-depth=1 | sort -nr | head -5

最后发现是/www/server/data目录下,有很多mysql-bin-000000 数字文件,每个文件大小1G,合在一起占用了产不多30G空间。

在MySQL数据库中,mysql-bin.000001、mysql- bin.000002等文件是数据库的操作日志,例如UPDATE一个表,或者DELETE一些数据,即使该语句没有匹配的数据,这个命令也会存储到日志文件中,还包括每个语句执行的时间,也会记录进去的。

这样做的目的是为了数据库恢复,或者主从服务器之间同步数据。

我不需要,所以直接注释掉数据库配置文件my.cnf中以下一行即可:

# log-bin=mysql-bin

删除所有 mysql-bin.00000 文件,重启mysql。

updtae:最好不要直接删除mysql-bin.文件,找到英文的解释。

简单来说是:不要直接删除,用mysqld来删除,可以通过修改/etc/my.cnf来设置数据库日志保存时间。

Please do not just delete them in the OS.

You need to let mysqld do that for you. Here is how mysqld manages it:

The file mysql-bin.[index] keeps a list of all binary logs mysqld has generated and auto-rotated. The mechanisms for cleaning out the binlogs in conjunction with mysql-bin.[index] are:

PURGE BINARY LOGS TO 'binlogname';
PURGE BINARY LOGS BEFORE 'datetimestamp';

These will clear all binary logs before the binlog or timestamp you just specified.

For example, if you run

PURGE BINARY LOGS TO 'mysql-bin.000223';

this will erase all binary logs before mysql-bin.000223.

If you run

PURGE BINARY LOGS BEFORE DATE(NOW() - INTERVAL 3 DAY) + INTERVAL 0 SECOND;

this will erase all binary logs before midnight 3 days ago.

If you want to have binlog rotated away automatically and keep 3 days woth, simply set this:

mysql> SET GLOBAL expire_logs_days = 3;

then add this to /etc/my.cnf

[mysqld]
expire_logs_days=3

and mysqld will delete them logs for you

2、var/log/journal日志文件

系统日志文件,也会占用越来越多的系统空间。

清理所有日志,但是保留最近3天的:

sudo journalctl --vacuum-time=3d

设定journal日志文件不超过100M:

sudo journalctl --vacuum-size=100M

这样就不需要经常清理journal日志了。

update: 早上起来,发现硬盘空间又多了4G,真头疼,继续找。。。

这次发现是/www/server/data/168itw.com目录下wp_wpr_rucss_resources.ibd和 wp_wpr_rucss_unused.ibd两个文件占用了几个G,而且 wp_wpr_rucss_unused.ibd还在一直增大。

Google看到这篇文章:

https://stackoverflow.com/questions/68347966/wp-wpr-rucss-resources-table-with-huge-size

原来是wordpress插件wp rocket惹的祸,不要勾选插件中Optimize CSS delivery选项,保存。

删除上述两个文件,删除数据库中的这两个table。搞定!

文章参考:https://blog.51cto.com/6226001001/1597205

感谢hostloc大佬提供查看命令帮助。
甲骨文(非ARM)dd出现Error, Not found interfaces config

甲骨文dd用的傻瓜式一键dd脚本:

或者也可以直接用:https://www.cxthhhhh.com/network-reinstall-system-modify

但是都出现了错误:Error, Not found interfaces config

网上找到的解决方案,运行如下两条命令:

mkdir /etc/network/interfaces.d
echo "# This file describes the network interfaces available on your system
# and how to activate them. For more information, see interfaces(5).

source /etc/network/interfaces.d/*

# The loopback network interface
auto lo
iface lo inet loopback

# The primary network interface
allow-hotplug ens3
iface ens3 inet dhcp

" > /etc/network/interfaces

重装后SSH登录,用户名root,密码:cxthhhhh.com

别忘记修改root密码:

root@baidu:~# passwd
Enter new UNIX password:
继续阅读

宝塔反代+CDN后Nginx日志获取不到真实IP

将源站反代,同时套上了cloudflare后,发现源站Nginx网站日志,获取不到用户的真实IP,日志中记录到的都是反代服务器IP,或者是cloudflare的IP。

查看反代服务器Nginx日志,发现记录的也都是cloudflare的IP。

在源服务器和反代服务器Nginx配置http{ 段中,添加以下3行代码,问题顺利解决:

set_real_ip_from 0.0.0.0/0;
real_ip_header X-Forwarded-For;
real_ip_recursive on;
  • set_real_ip_from:定义接受从哪个信任前代理处获得真实用户ip,可以定义多行,可定义为ip,ip段,支持ipv4和ipv6
  • real_ip_header:定义从接收到报文的哪个http头部去获取前代理传送的用户ip,默认为X-Real-IP
  • real_ip_recursive:递归搜索,默认为off

以下为引用:

继续阅读

腾讯轻量云更换apt镜像源

腾讯轻量云无忧,在dd或者安装宝塔的时候,都会提示没有unzip的错误,需要替换掉腾讯的apt镜像源。

vim /etc/apt/sources.list

自带的源如下:

deb http://mirrors.tencentyun.com/debian buster main contrib non-free
# deb-src http://mirrors.tencentyun.com/debian buster main contrib non-free
deb http://mirrors.tencentyun.com/debian buster-updates main contrib non-free
# deb-src http://mirrors.tencentyun.com/debian buster-updates main contrib non-free
deb http://mirrors.tencentyun.com/debian-security buster/updates main contrib non-free

# deb-src http://mirrors.tencentyun.com/debian-security buster/updates main contrib non-free
# deb http://mirrors.tencentyun.com/debian buster-backports main contrib non-free
# deb-src http://mirrors.tencentyun.com/debian buster-backports main contrib non-free
# deb http://mirrors.tencentyun.com/debian buster-proposed-updates main contrib non-free
# deb-src http://mirrors.tencentyun.com/debian buster-proposed-updates main contrib non-free

替换为tuna清华apt镜像源:

deb https://mirrors.tuna.tsinghua.edu.cn/debian/ bullseye main contrib non-free
# deb-src https://mirrors.tuna.tsinghua.edu.cn/debian/ bullseye main contrib non-free
deb https://mirrors.tuna.tsinghua.edu.cn/debian/ bullseye-updates main contrib non-free
# deb-src https://mirrors.tuna.tsinghua.edu.cn/debian/ bullseye-updates main contrib non-free
 
deb https://mirrors.tuna.tsinghua.edu.cn/debian/ bullseye-backports main contrib non-free
# deb-src https://mirrors.tuna.tsinghua.edu.cn/debian/ bullseye-backports main contrib non-free
 
deb https://mirrors.tuna.tsinghua.edu.cn/debian-security bullseye-security main contrib non-free
# deb-src https://mirrors.tuna.tsinghua.edu.cn/debian-security bullseye-security main contrib non-free

再执行下面命令更新apt源后重新安装unzip:

apt-get update
apt install unzip -y

腾讯云一键dd debian或者win,看之前的文章:

继续阅读

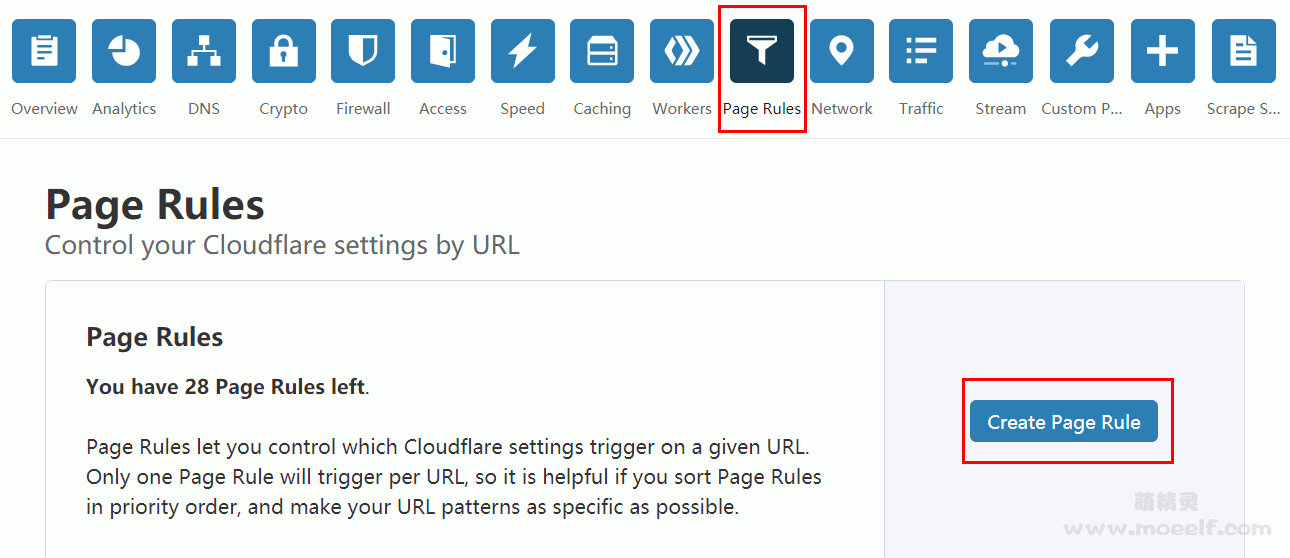
Cloudflare缓存全站设置

本文参考了萌精灵的文章和cloudflare官方说明。

CloudFlare 默认只对静态资源进行缓存。动态资源是默认不缓存的。如果你的内容基本是静态的或者不在意实时更新的话,可以使用 CloudFlare 的页面规则设置缓存所有内容。免费用户可以设置3条页面规则,Pro 用户可以使用 30 条规则。

1、添加新的页面规则。

cf_1.png
继续阅读

MTR链路测试诊断网络

  • MTR(My traceroute)是几乎所有Linux发行版本预装的网络测试工具,此工具也有对应的Windows版本,名称为WinMTR。
  • MTR工具将ping和traceroute命令的功能并入了同一个工具中,实现更强大的功能。
  • 相对于traceroute命令只会做一次链路跟踪测试,mtr命令会对链路上的相关节点做持续探测并给出相应的统计信息。所以,mtr命令能避免节点波动对测试结果的影响,所以其测试结果更正确,建议优先使用。

安装MTR

Ubuntu

apt install mtr-tiny

CentOS

yum install mtr

Arch Linux

pacman -Syu
pacman -S mtr

Mac OS X

brew install mtr

Windows下载地址:https://sourceforge.net/projects/winmtr/

使用

mtr -r 8.8.8.8
mtr 8.8.8.8

输出

默认配置下,返回结果中各数据列的说明如下。

第一列(Host):节点IP地址和域名。如前面所示,按n键可以切换显示。

第二列(Loss%):节点丢包率。

第三列(Snt):每秒发送数据包数。默认值是10,可以通过参数“-c”指定。

第四列(Last):最近一次的探测延迟值。

第五、六、七列(Avg、Best、Wrst):分别是探测延迟的平均值、最小值和最大值。

第八列(StDev):标准偏差。越大说明相应节点越不稳定。

诊断

对链路测试结果进行分析时,需要关注如下几点:

继续阅读

腾讯轻量云一键DD Debian及Win

#确保安装了所需软件:
#Debian/Ubuntu:
apt-get install -y xz-utils openssl gawk file

#RedHat/CentOS:
yum install -y xz openssl gawk file

#dd win,直链包链接自己找个替换下
bash <(wget --no-check-certificate -qO- 'https://moeclub.org/attachment/LinuxShell/InstallNET.sh') -dd "这里放你要dd包的直链.tar.gz" --mirror 'http://mirrors.ustc.edu.cn/debian/'

#DD成Debian10:
bash <(wget --no-check-certificate -qO- 'https://moeclub.org/attachment/LinuxShell/InstallNET.sh') -d 10 -v 64 -a -p 你的密码 --mirror 'http://mirrors.ustc.edu.cn/debian/'

#DD Debian 9:
bash <(wget --no-check-certificate -qO- 'https://moeclub.org/attachment/LinuxShell/InstallNET.sh') -d 9 -v 64 -a -p 你的密码 --mirror 'http://mirrors.ustc.edu.cn/debian/'

不同镜像:

#国外服务器
bash InstallNET.sh -d 10 -v 64 -a --mirror 'http://ftp.debian.org/debian/' -p "yourpassword" 
 
#国内服务器 
bash InstallNET.sh -d 10 -v 64 -a --mirror 'http://mirrors.ustc.edu.cn/debian/' -p "yourpassword" 
 
#腾讯云 
 
bash InstallNET.sh -d 10 -v 64 -a --mirror 'https://mirrors.cloud.tencent.com/debian/' -p "yourpassword"

拓展:cxhhhhhh魔改版dd(适用于Linux / Windows)

继续阅读

upgrade和update的区别

Linux系统中,upgrade和update的区别:

update:更新软件包列表到最新版本,但是他不会去升级软件;

upgrade:升级软件到最新版本。

所以一般是先update软件包列表到最新版本,然后upgrade安装最新版软件。

引用原文如下:

You should first run update, then upgrade. Neither of them automatically runs the other.

  • apt-get update updates the list of available packages and their versions, but it does not install or upgrade any packages.
  • apt-get upgrade actually installs newer versions of the packages you have. After updating the lists, the package manager knows about available updates for the software you have installed. This is why you first want to update.

Additionally, you can use apt-get update && apt-get upgrade to do both steps after each other.